Snippet options
Options allow publishers to edit a snippet’s appearance using the Website Builder’s UI. Using Website Builder functionalities, you can create snippet options easily and automatically add them to the UI.
Options group properties
Options are wrapped in groups. Groups can have properties that define how the included options will interact with the user interface.
data-selector=" css selector(s) "
Bind all the options included into the group to a particular element.
data-js=" custom method name "
Is used to bind custom Javascript methods.
data-drop-in=" css selector(s) "
Defines the list of elements where the snippet can be dropped into.
data-drop-near=" css selector(s) "
Defines the list of elements that the snippet can be dropped beside.
Default option methods
Options apply standard CSS classes to the snippet. Depending on the method that you choose, the UI will behave differently.
data-select_class=" class name "
More data-select_class in the same group defines a list of classes that the user can choose to apply. Only one option can be enabled at a time.
data-toggle_class=" class name "
The data-toggle_class is used to apply one or more CSS classes from the list to a snippet. Multiple selections can be applied at once.
Let's demonstrate how default options work with a basic example.
We start by adding a new file in our views folder - name itoptions.xmland add the default Odoo XML markup. Create a new template copy/pasting the following
<template id="snippet_testimonial_opt"
name="Snippet Testimonial Options" inherit_id="website.snippet_options">
<xpath expr="//div[@data-js='background']" position="after">
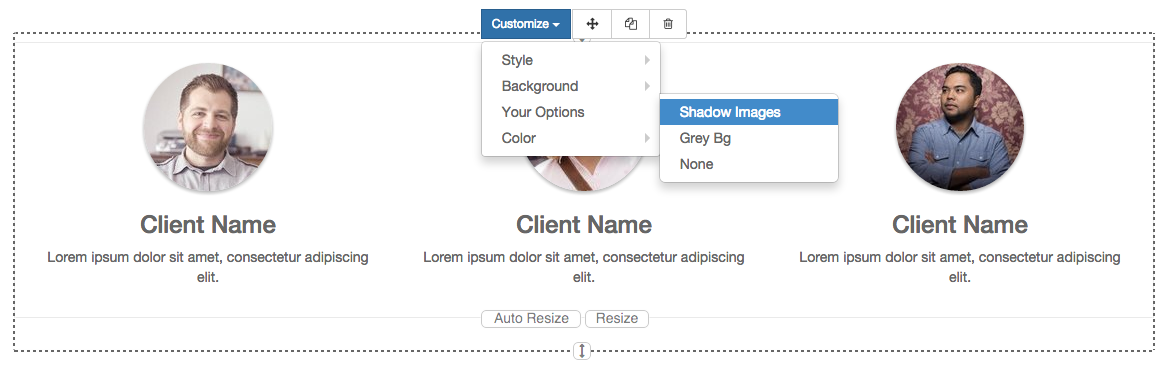
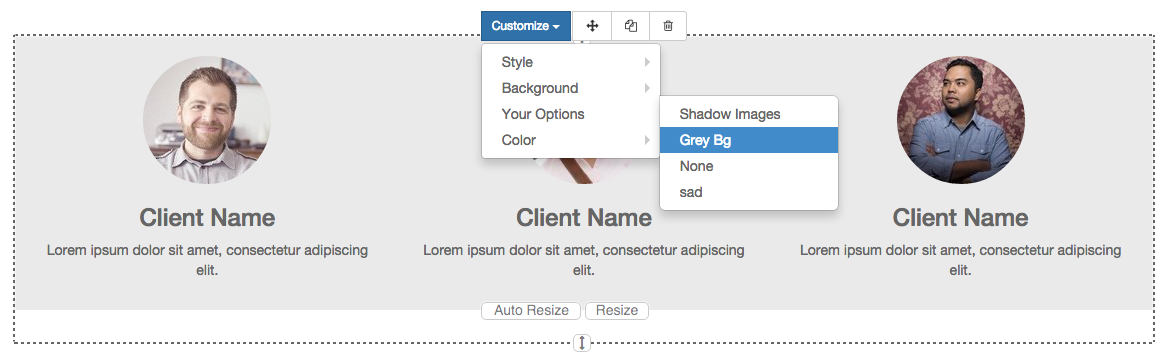
<div data-selector=".snippet_testimonial"> <!-- Options group -->
<li class="dropdown-submenu">
<a href="#">Your Option</a>
<ul class="dropdown-menu"> <!-- Options list -->
<li data-select_class="opt_shadow"><a>Shadow Images</a></li>
<li data-select_class="opt_grey_bg"><a>Grey Bg</a></li>
<li data-select_class=""><a>None</a></li>
</ul>
</li>
</div>
</xpath>
</template>
Note
The previous template will inherit the defaultsnippet_options templateadding our options after thebackgroundoptions (xpath expr attribute). To place your options in a particular order, inspect thesnippet_options templatefrom thewebsite moduleand add your options before/after the desired position.
As you can see, we wrapped all our options inside a DIV tag that will group our options and that will target them to the right selector (data-selector=".snippet_testimonial").
To define our options we applieddata-select_classattributes to thelielements. When the user selects an option, the class contained in the attribute will automatically be applied to the element.
Sinceselect_classmethod avoids multiple selections, the last "empty" option will reset the snippet to default.
Addoptions.xmlto__manifest__.pyand update your theme.
Dropping our snippet onto the page, you will notice that our new options are automatically added to the customize menu. Inspecting the page, you will also notice that the class will be applied to the element when selecting an option.
 Let’s create some css rules in order to provide a visual feedback for our options. Open our style.less file and add the following
.snippet_testimonial {
  border: 1px solid #EAEAEA;
  padding: 20px;
}

// These lines will add a default style for our snippet. Now let's create our custom rules for the options.

.snippet_testimonial {
  border: 1px solid #EAEAEA;
  padding: 20px;

  &.opt_shadow img {
    box-shadow: 0 2px 5px rgba(51, 51, 51, 0.4);
  }

  &.opt_grey_bg {
    border: none;
    background-color: #EAEAEA;
  }
}
 Great! We successfully created options for our snippet.
Any time the publisher clicks on an option, the system will add the class specified in the data-select_class attribute.
By replacingdata-select_classwithdata-toggle_classyou will be able to select more classes at the same time.
Javascript Options
data-select_classanddata-toggle_classare great if you need to perform simple class change operations. But what if your snippet’s customization needs something more?
As we said before,data-jspropriety can be assigned to an options group in order to define a custom method. Let’s create one for our_testimonials snippet_by adding adata-jsattribute to the option’s group div that we created earlier.
<div data-js="snippet_testimonial_options" data-selector=".snippet_testimonial">
  [...]
</div>
Done. From now on, the Website Builder will look for asnippet_testimonial_optionsmethod each time the publisher enters in edit mode.
Let's go one step further by creating a javascript file, name ittutorial_editor.jsand place it into thestaticfolder. Copy/paste the following code
(function() {
    'use strict';
    var website = odoo.website;
    website.odoo_website = {};
})();
Great, we successfully created our javascript editor file. This file will contain all the javascript functions used by our snippets in edit mode. Let’s create a new function for our testimonial snippet using thesnippet_testimonial_optionsmethod that we created before.
(function() {
'use strict';
var website = odoo.website;
website.odoo_website = {};
website.snippet.options.snippet_testimonial_options = website.snippet.Option.extend({
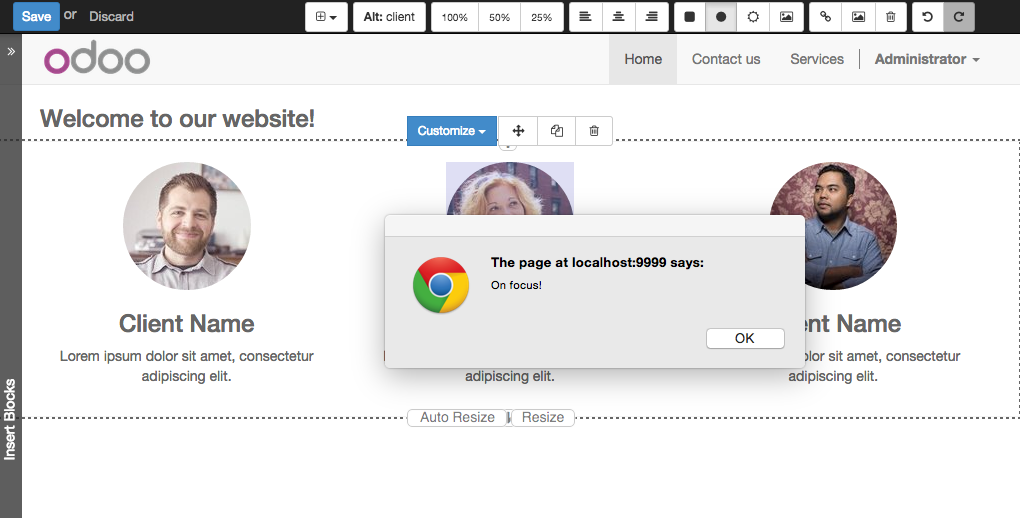
on_focus: function() {
alert("On focus!");
}
})
})();
As you will notice, we used a method calledon_focusto trigger our function. The Website Builder provides several events you can use to trigger your custom functions.
| Event | Description |
|---|---|
start |
Fires when the publisher selects the snippet for the first time in an editing session or when the snippet is drag-dropped into the page |
on_focus |
Fires each time the snippet is selected by the user or when the snippet is drag-dropped into the page. |
on_blur |
This event occurs when a snippet loses focus. |
on_clone |
Fires just after a snippet is duplicated. A new js variable is created ($clone) containing the cloned element. |
on_remove |
It occurs just before that the snippet is removed. |
drop_and_build_snippet |
Fires just after that the snippet is drag and dropped into a drop zone. When this event is triggered, the content is already inserted in the page. |
clean_for_save |
It trigger before the publisher save the page. |
Let’s add our new javascript files to the editor assets list. Go back to assets.xml and create a new template like the previous one. This time we have to inherit assets_editorinstead of assets_frontend.
<template id="my_js" inherit_id="website.assets_editor" name="My Js">
  <xpath expr="script[last()]" position="after">
    <script type="text/javascript" src="/theme_tutorial/static/src/js/tutorial_editor.js" />
  </xpath>
</template>
Update your theme
Let’s test our new javascript function. Enter in Edit mode and drop into the page. You should now see the javascript alert that we bound on the on_focusevent. If you close it, then click outside of your snippet and then click in it again, the event will trigger again.